If you are looking to lose belly fat, then incorporating some yoga asanas into your routine may help. They may help target the flab in the abdomen area, burn calories, make your muscles more flexible, and may improve metabolismi . Belly fat occurs due to age, genetics, an unhealthy lifestyle, poor eating habits, not working out regularly, and stress (1). In fact, reduced abdominal strength and structure also lead to lower back pain, poor posture, and sagging. Combining a balanced diet with yoga may help you shed belly fat. All you need to do is adhere to the plan and do the yoga poses regularly. There are many yoga poses for weight loss, especially for reducing belly fat.
Brandt Passalacqua, a yoga therapist, says, “The amount of time it takes to reduce belly fat with yoga depends on your body, your current fitness level and exercise routine, and the frequency, duration, and poses in your yoga practice. In many cases, it will take anywhere from a few weeks to a few months in order to see results.”
He adds, “There are a number of factors that go into weight loss, which can differ from person to person. If you currently are not exercising at all, then 20 minutes of yoga a day may be enough to make a difference in your weight over time.
A study showed that obesity increased to 38.0% in males and 74.7% in females in 2015–2016 respectively. It also indicated that obesity and overweight percentages increased to 41.5% and 68.9% respectively in the same year.
Even if you do end up needing to practice yoga more in order to meet your goals, starting with 20 minutes a day can help you build the muscle, flexibility, and endurance you’ll need to do more.”
This article lists the yoga asanas you need to do to get rid of belly fat. Check them out!
In This Article

1. Benefits of Practicing Yoga for Belly Fat Reduction
2. Yoga Asanas To Reduce Belly Fat
3. Yoga Experts Tips To Reduce Belly Fat
4. Key Takeaways
5. Infographic: Tips To Reduce Belly Fat
6. Frequently Asked Questions
Benefits of Practicing Yoga for Belly Fat Reduction
Practicing yoga regularly can be an effective way to reduce belly fat and improve overall health. Here are some key benefits:
1. Targets Core Muscles
- Yoga poses like Boat Pose (Navasana), Plank Pose, and Cobra Pose strengthen and tone abdominal muscles, reducing belly fat over time.
2. Improves Digestion
- Twisting poses like Seated Twist (Ardha Matsyendrasana) and Wind-Relieving Pose (Pavanamuktasana) help stimulate the digestive system, preventing bloating and enhancing metabolism.
3. Reduces Stress and Cortisol Levels
- Stress increases cortisol, a hormone linked to fat accumulation around the abdomen. Yoga practices like Child’s Pose, Savasana, and Meditation promote relaxation, reducing cortisol levels.
4. Enhances Fat-Burning
- Dynamic yoga styles like Power Yoga or Vinyasa Flow increase heart rate and calorie burn, supporting overall fat loss, including around the belly.
5. Boosts Metabolism
- Certain poses, such as Bow Pose (Dhanurasana) and Camel Pose (Ustrasana), stimulate the endocrine glands, which can help regulate metabolism.
6. Improves Posture
- Poor posture can make your belly appear larger. Yoga strengthens core muscles and aligns the spine, improving posture and reducing belly bulge.
7. Encourages Mindful Eating
- Practicing yoga increases self-awareness, which can lead to better eating habits and avoidance of emotional eating, contributing to a leaner waistline.
8. Increases Overall Physical Activity
- Regular yoga practice builds discipline and encourages an active lifestyle, supporting sustained weight loss and muscle toning.
Would you like suggestions for a yoga routine or guidance on specific poses?
Yoga Asanas To Reduce Belly Fat
- Tadasana (Mountain Pose)
- Surya Namaskar (Sun Salutation)
- Padahastasana (Standing Forward Bend)
- Paschimottanasana (Seated Forward Bend)
- Pavanamuktasana (Wind Relieving Pose)
- Naukasana (Boat Pose)
- Ustrasana (Camel Pose)
- Uttanpadasana (Raised Foot Pose)
- Marjariasana (Cow Cat Pose or Cat Pose)
- Bhujangasana (Cobra Pose)
- Shavasana (Corpse Pose)
- Tadasana (Mountain Pose)
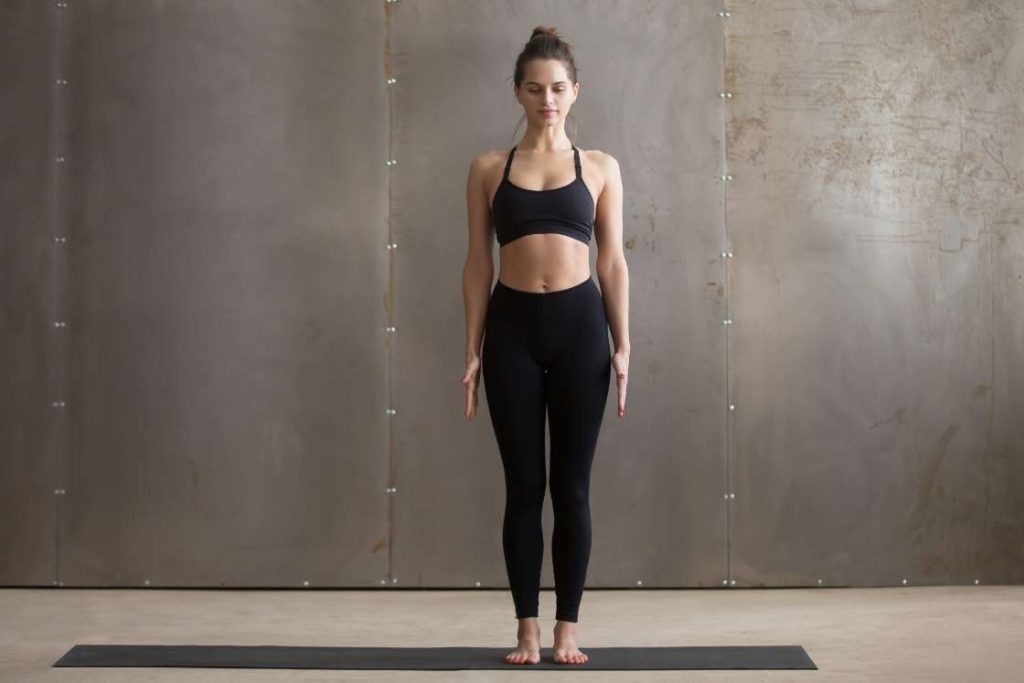
Tadasana is an ideal warm-up pose. It may improve blood circulation and activate the core and other peripheral areas, thereby preparing your body for the other poses in store.
How To Do
- Stand with your feet flat, heels slightly spread out, and the big toes of your feet in contact with each other. Keep the spine erect with hands on both sides and palms facing your body.
- Stretch your hands to the front and bring the palms close to each other.
- Inhaling deeply, stretch your spine. Raising your folded hands up above your head, stretch as much as you can.
- Try lifting your ankles and standing on your toes, with the eyes facing the ceiling. If you cannot stand on your toes, you can keep your feet flat on the ground, while your eyes face the ceiling.
- Breathe normally and hold the pose for 20 to 30 seconds.
- Inhale deeply, and while exhaling, slowly relax and bring your feet back to the floor.
- Repeat the asana 10 times, increasing the count gradually. Relax for 10 seconds before you attempt the next repetition. The picture given above is a variation for beginners.
Common Mistakes To Avoid
- Keep shoulders relaxed and not hunched up towards your ears.
- Keep your hips directly above your ankles.
Variations
The mountain pose has variations in terms of positioning the arms. You can stretch your arms upward, parallel to each other, and perpendicular to the floor.
Benefits
- May improve your posture
- May firm the abdomen and buttocks
- May strengthen thighs, knees, and ankles
- May relieve sciatica (pain that affects the back, hips, and the outer side of the legs)
Caution
People with low blood pressure, insomnia, and headache can perform the basic asana and not look up or go in for variations of this posture.
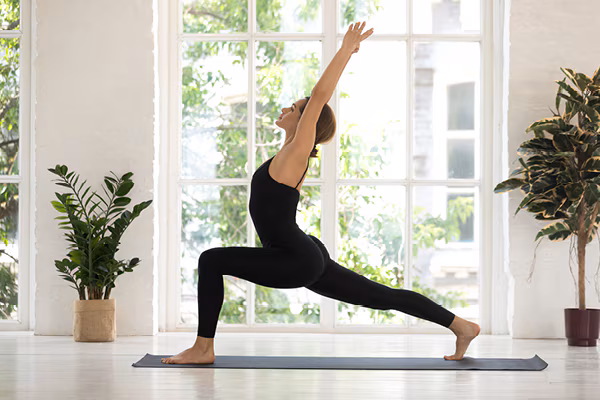
2. Surya Namaskar (Sun Salutation)

Surya Namaskar is a confluence of twelve yoga positions, each of which has a major impact on the entire body. The forward and backward bends allow stretches, while the deep breathing performed during the act may help in detoxification. Practice Surya Namaskar daily in the morning, facing the sun, for reaping the maximum benefits.
How To Do
- Stand with both your feet together, expand your chest, and relax your shoulders.
- As you inhale, lift both your arms from the sides. And as you exhale, bring your arms to the front of your chest and keep them in the prayer position.
- Inhale, raise your hands, and stretch backwards, slightly.
- Exhale, bend forward, and try to touch your forehead to the knees.
- Bending your left knee, stretch your right leg backward, with your palms placed on the floor.
- Move into downward dog position.
- From Adhomukha (downward dog), coming on the tips of the toes, move forward in an Ashtanga Namaskar (a form of Chaturangadandasana), where the hips are slightly elevated and take the entire torso in one plane down towards the floor.
- Inhale, stretch forward, and bend backwards into Urdhvamukha,or upward facing dog.
- Keeping your hands fixed on the floor, move the torso into downward dog.
- As you inhale, bring your right leg forward, in between your elbows and stretch upwards.
- Bring your left leg forward and inhale deeply.
- Stretch back from the waist.
- Return to the initial position.
Common Mistakes To Avoid
- Do not rush through the transitions; focus on breathing with each movement.
- Avoid locking your elbows in poses like a downward dog.
- Keep the spine neutral and avoid straining it while bending forward or backward.
Benefits
From head to toe, all parts of the body and the internal organs are benefited by this pose. Regularly practicing Surya Namaskar keeps you healthy and energized.
Anita, a YouTuber, shared her experience of doing Surya Namaskar for 30 days. She explained, “Does Surya Namaskar aid in weight loss and tummy reduction? Yes, it does (i).” She then continues that she weighed 64 kg before this challenge and says, “I ended up losing 3 inches on the waist, 4 inches on the hips, and 6kg in total.” She also mentioned gaining some muscles.
Caution
Women must not perform Surya Namaskar during menstruation. Pregnant women must check with their doctor before performing this asana.
People with spinal problems, high blood pressure, cardiovascular diseases must not perform this pose.
3. Padahastasana (Standing Forward Bend)
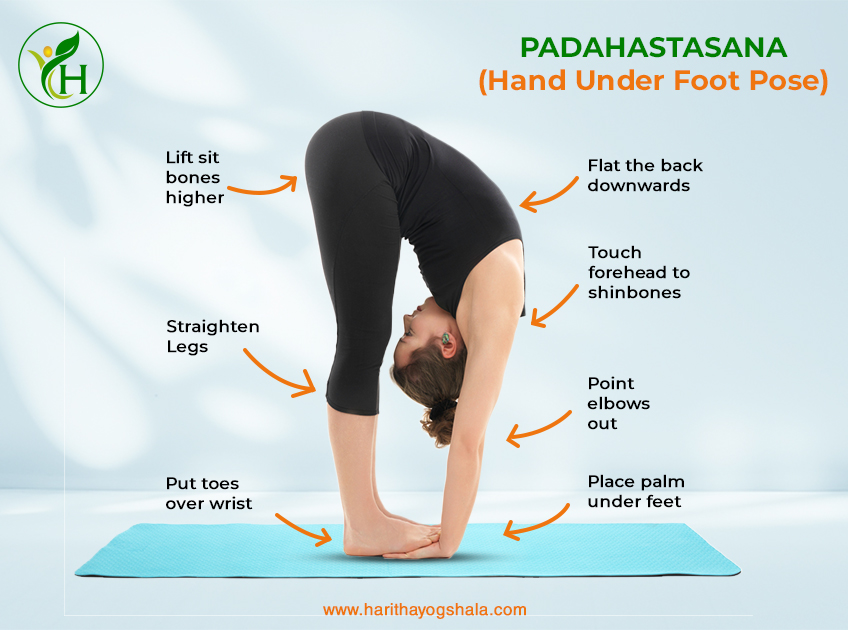
This forward fold is really good for the heart and may relieve issues like anxiety and is good for getting the heart rate slowed down. The abdominals become soft and relaxed, allowing the stomach to do its work, which may help address major or minor abdominal issues.
How To Do
- Stand in the Tadasana pose, with your hands on either side of the body while your feet rest together, with the heels touching each other.
- Keep your spine erect.
- Inhaling deeply, lift your hand upwards.
- As you exhale, bend forward such that your body is parallel to the floor.
- Inhale, then exhale, and bend forward completely, with your body falling away from the hips.
- Try to touch the floor, with palms straight on the floor, and without bending your knees. Beginners can try touching the toes or just the ankles to start with, working your way to the floor.
- Inhale while coming up into Tadasana. It is good to stay in this asana for slightly longer durations as per individual capabilities and need.
Common Mistakes To Avoid
- Avoid rounding your back; hinge at your hips.
- Don’t lock your knees; keep a slight bend to protect them.
- Engage your core to prevent overstraining the lower back.
Variations
Padahastasana has variations in terms of holding your toes, placing your hands beneath the balls of your feet, or simply holding your ankles or shins.
Benefits
May improve digestion, as your abdominal muscles are toned
May strengthen the wrist joints
May relieve mental and physical exhaustion
Caution
Before performing Padahastasana, you need to master Uttanasana, which is a less challenging forward-bending pose. Also, people with spinal disc disorders must refrain from performing this pose.
4. Paschimottanasana (Seated Forward Bend)
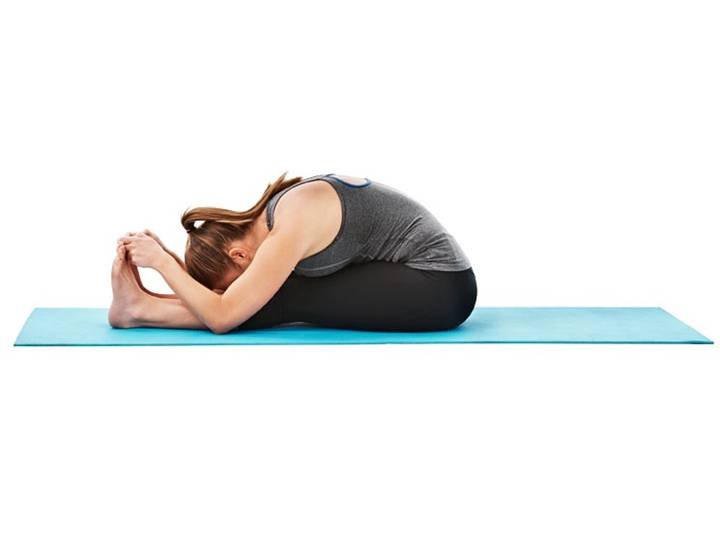
Paschimottanasana (Seated Forward Bend) is a classic yoga pose known for its calming effects and physical benefits, particularly in stretching the back and improving flexibility. Here’s a detailed guide:
Benefits of Paschimottanasana
- Reduces Belly Fat
- This pose compresses the abdomen, stimulating digestion and helping reduce fat in the abdominal region over time.
- Improves Digestion
- The forward bend massages internal organs, enhancing metabolism and aiding digestion.
- Stretches the Back and Hamstrings
- It provides a deep stretch to the spine and the back of the legs, improving flexibility and posture.
- Calms the Mind
- The pose helps reduce stress and anxiety, indirectly lowering cortisol levels that contribute to belly fat.
- Stimulates Internal Organs
- It promotes healthy functioning of the kidneys, liver, and pancreas, which are essential for detoxification and fat metabolism.
Step-by-Step Instructions
- Starting Position
- Sit on the floor with your legs extended straight in front of you. Keep your spine upright and your toes pointing upward.
- Prepare for the Stretch
- Inhale deeply and extend your arms overhead, lengthening your spine.
- Forward Bend
- Exhale and hinge at your hips to bend forward, keeping your back straight.
- Reach for your feet, ankles, or shins (depending on your flexibility). If you can, hold your feet or clasp your toes.
- Relax into the Pose
- Gently lower your head toward your legs, aiming to rest your forehead on your shins. Avoid forcing the stretch.
- Hold the Pose
- Maintain the position for 20–30 seconds, gradually increasing to 1–2 minutes as you build flexibility. Focus on your breath, keeping it slow and steady.
- Release
- Inhale and slowly return to the starting position, rolling your spine up one vertebra at a time.
Tips for Beginners
- Use a strap around your feet if you cannot reach them.
- Bend your knees slightly if your hamstrings are tight, gradually working toward straight legs.
- Focus on the stretch and relaxation, not how far you can bend.
Would you like to explore other complementary poses or modifications for this asana?
5. Pavanamuktasana (Wind Relieving Pose)

Pavanamuktasana (Wind Relieving Pose) is a gentle yet effective yoga pose known for its benefits in aiding digestion, relieving bloating, and reducing belly fat. Here’s everything you need to know about this pose:
Benefits of Pavanamuktasana
- Aids Digestion and Relieves Bloating
- Compresses the abdomen, massaging the intestines and promoting better digestion.
- Helps Reduce Belly Fat
- Regular practice strengthens the abdominal muscles and stimulates fat metabolism.
- Relieves Lower Back Tension
- Gently stretches the lower back and spine, relieving tension and improving posture.
- Eases Gas and Improves Gut Health
- Known for alleviating trapped gas, reducing discomfort and bloating.
- Stimulates Circulation
- Improves blood flow to the abdominal region, enhancing organ function.
- Relaxes the Mind
- The pose helps relieve stress and anxiety, contributing to overall well-being.
Step-by-Step Instructions
- Starting Position
- Lie flat on your back on a yoga mat, arms resting by your sides, and legs extended.
- Bring One Leg Up
- Inhale deeply and as you exhale, bend your right knee and bring it toward your chest.
- Interlace your fingers around the shin just below the knee.
- Compress the Abdomen
- Pull your knee gently toward your chest, feeling the compression in your lower abdomen. Keep your left leg extended and active.
- Add the Head Lift (Optional)
- If comfortable, lift your head and try to touch your nose or chin to your right knee. This increases abdominal compression.
- Switch Legs
- Release the right leg back to the floor and repeat the movement with your left leg.
- Full Pose
- For a deeper stretch, bring both knees toward your chest, clasp your hands around them, and pull them closer.
- Hold and Relax
- Hold the pose for 20–30 seconds, gradually increasing to 1 minute. Focus on steady breathing.
- Release
- Exhale and lower your legs back to the floor, arms resting by your sides.
Tips for Beginners
- Keep your movements slow and controlled to avoid straining your neck or back.
- If lifting your head is uncomfortable, keep it resting on the floor.
- Use a folded blanket under your head for extra support if needed.
Precautions
- Avoid this pose if you have recent abdominal surgery, hernia, or severe neck pain.
- Practice on an empty stomach, preferably in the morning or 4–5 hours after eating.
Would you like a yoga sequence that includes Pavanamuktasana or advice on incorporating it into your routine?
6. Naukasana (Boat Pose)
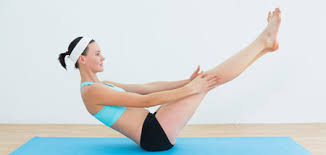
Naukasana is one of the most sought after yoga postures that will guarantee you a flatter belly with regular practice. While holding the posture for more than a minute helps in contracting the abdominal muscles, the posture, when done in a boat-like movement, may help in toning your abs.
How To Do
- Lie down on the yoga mat in the supine position, legs stretched out, toes facing the ceiling, and palms resting on either side of your body facing the ground.
- Inhale deeply. As you exhale, lift your body (the head, chest, and legs) from the ground.
- Stretch out your arms so that they form a parallel line with your legs.
- Your fingers should be in the same line as the toes. Gaze towards the toes.
- As you hold the position, you should feel the abdominal muscles contracting.
- Breathing normally, hold the posture for 30 to 60 seconds to start with.
- Inhale, and then exhaling deeply, slowly relax and come back to the supine position.
- Repeat this asana five times to begin with, working up to 30 times gradually. Relax for 15 seconds after each repetition.
Common Mistakes To Avoid
- Keep the chest open.
- Ensure your spine stays neutral without straining your neck.
- Do not bend the knees. Keep them straight for a full abdominal contraction.
Variations
You can also perform Naukasana with your fists closed as if you are holding the oars of a boat.
Benefits
- May strengthen the abdominal muscles and helps remove belly fat
- May improve the health of digestive organs
- May strengthen arms, thighs, and shoulders
Caution
People suffering from blood pressure issues, heart problems, diarrhea, headache, and insomnia must refrain from performing this pose. Also, pregnant and menstruating women should not practice this pose.
7. Ustrasana (Camel Pose)
Ustrasana is normally done to counter the Naukasana pose. The backward stretch that you experience as you touch your ankles in this pose helps in toning the abdominal muscles. The tension experienced by your belly muscles during Naukasana will now be released, and at the same time, you will also enjoy a good stretch.
How To Do
- Sit in Vajrasana.
- Slowly, lift your body from your knees such that you are now sitting with your whole body weight supported by your knees.
- Your heels should make a perpendicular line with the ground.
- Exhale deeply, and arch your back. Bring your hands behind your body, and try to hold your ankles, one by one.
- Tilt your head behind and stretch backwards, until you experience a stretch in your belly.
- Hold the posture for 20 to 30 seconds to begin with, working your way to 60 seconds, breathing normally.
- Exhale and slowly relax.
- Come back to Vajrasana.
- Repeat this asana five times to begin with, working up to 30 times gradually.
- Relax for 15 seconds after each repetition.
Common Mistakes To Avoid
- Avoid collapsing into your lower back.
- Do not push your hips too far forward. Keep them over the knees.
- Ensure the neck is aligned with the spine to prevent strain.
Variations
After you have attained the Ustrasana pose, instead of returning to Vajrasana, slowly drop your head back and stay that way. Ensure you practice this variation only after you have mastered the original Ustrasana pose.
Benefits
- May strengthen the back muscles
- Can improve posture
- May treat fatigue, menstrual discomfort, and mild back pain
Caution
People who suffer from heart-related ailments, lower back or neck injury, and high blood pressure must not perform this pose. Individuals who have migraines and insomnia must also refrain from performing this pose.
8. Uttanpadasana (Raised Foot Pose)
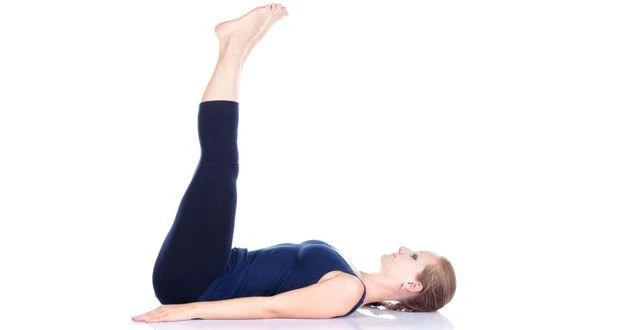
Uttanpadasana (Raised Foot Pose) is a highly effective yoga pose for strengthening the abdominal muscles, improving digestion, and reducing belly fat. Here’s a complete guide to this pose:
Benefits of Uttanpadasana
- Tones Abdominal Muscles
- Strengthens and tones the lower abdominal muscles, helping reduce fat in the belly region.
- Improves Digestion
- Stimulates the digestive organs, enhancing metabolism and relieving constipation.
- Strengthens Core and Lower Back
- Builds a strong core and supports the lower back, improving posture and stability.
- Enhances Blood Circulation
- Improves blood flow to the abdominal region, promoting organ health and detoxification.
- Reduces Stress
- Encourages mindfulness and relaxation, helping manage stress and cortisol levels.
Step-by-Step Instructions
- Starting Position
- Lie flat on your back on a yoga mat, arms by your sides with palms facing downward. Keep your legs extended and feet together.
- Engage the Core
- Inhale deeply and engage your abdominal muscles.
- Lift Your Legs
- Exhale and slowly lift both legs together off the ground, keeping them straight. Aim for a 30–45-degree angle or, if comfortable, bring them to 90 degrees perpendicular to the floor.
- Hold the Position
- Maintain the pose, keeping your legs steady and core engaged. Focus on breathing deeply. Hold for 10–30 seconds, gradually increasing as your strength improves.
- Lower Your Legs
- Exhale and slowly lower your legs back to the ground, keeping control to avoid jerking or arching your back.
- Rest and Repeat
- Rest for a few breaths and repeat 3–5 times.
Tips for Beginners
- Modify with One Leg: If lifting both legs is too challenging, start by lifting one leg at a time.
- Support Your Lower Back: Place your hands under your hips for extra support.
- Breathe Consistently: Avoid holding your breath while maintaining the pose.
Precautions
- Avoid this pose if you have:
- Lower back pain or injuries
- Recent abdominal surgery
- High blood pressure or heart conditions
- Always practice on an empty stomach or at least 4–5 hours after a meal.
Would you like additional tips on incorporating Uttanpadasana into your yoga practice or routines for building abdominal strength?
9. Marjariasana (Cow Cat Pose or Cat Pose)
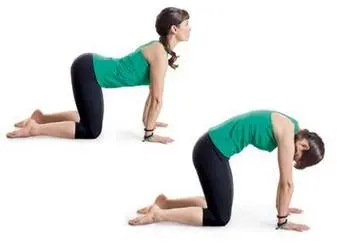
The forceful contraction experienced in the abdominal muscles while holding the posture helps in melting the fat, and thus, reduces the belly size. This pose is also beneficial in enhancing the flexibility of the spine.
How To Do
- Sit in Vajrasana.
- Breathing normally, rise from the position, and allow your body to come parallel to the floor such that your body rests on your knees and palms.
- While the knees should be placed beneath your hips, the palms must go under your shoulders facing the floor. Keep the head straight. Space out the knees slightly so that your weight is spread out evenly.
- Inhaling deeply, lift your head while pushing your back down, so that your body has a concave structure.
- Expand the abdominal region as much as possible to suck in the maximum amount of air.
- Holding your breath, maintain the posture for about 15 to 30 seconds.
- Exhale deeply and lower the head, while arching your back upwards. Keep your buttocks and abdomen firm until you experience the contraction. Your head should be between your hands.
- Breathing deeply, hold the pose for about 15 to 30 seconds, working up to 60 to 90 seconds gradually.
- Exhale and slowly come back to Vajrasana. Relax for 15 seconds.
- Repeat this asana 10 times to begin with, working up to 30 times gradually.
- Relax for 15 seconds after each repetition. This is also one of the best yoga asanas to reduce belly fat.
Common Mistakes To Avoid
- Avoid overextending the lower back in the Cow pose.
- Keep wrists aligned under shoulders to avoid strain.
Variations
Start by resting in the tabletop position (body resting on your knees and palms). Inhale, and as you do so, push your back down to attain a concave structure. As you exhale, instead of lowering your head, turn it to the left such that your eyes focus on your left hip. Repeat on the other side, keeping the rest of the steps as they are.
Benefits
- May improve the sturdiness of the spinal column
- May help correct your posture
- May relieve tension in the lower back
Caution
If you are suffering from head injury, ensure that you keep your head in line with your torso as you perform this pose.
10. Bhujangasana (Cobra Pose)
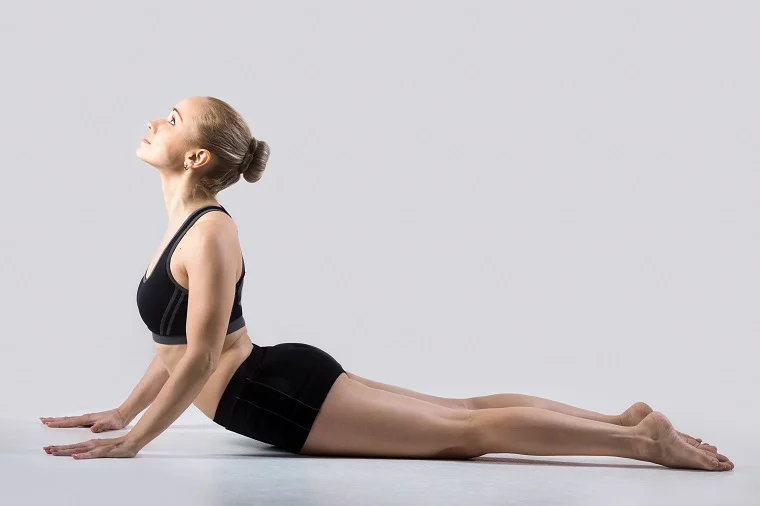
Give your abdomen a good stretch with this yoga asana. The regular practice of this asana aids in strengthening the back muscles, and hence, it is one of the most advised poses to alleviate post-partum back pain.
How To Do
- Lie down on the mat in the prone position (with your chest facing down), legs slightly spaced out, and toes touching the floor.
- Keep the hands on either side of the body, palms facing the floor.
- Bring your palms beneath your shoulders.
- Inhaling deeply, slowly lift your chest and head off the floor, your gaze fixed on the ceiling. Tuck in your pubis towards your navel, while keeping your buttocks firm.
- Hold the position for 15 to 30 seconds, while breathing normally.
- Take a deep breath and try to lift your body from the waist upward, bending backward as much as possible. Nevertheless, make sure that you are not hurting your back in the process.
- Hold the posture for 30 to 60 seconds, breathing normally.
- Exhale and slowly bring your body down – chest, neck, and forehead – to return to the prone position. Stretch your arms slowly to the front.
- Repeat this asana 10 times to begin with, working up to 30 times gradually.
- Relax for 15 seconds after each repetition.
Common Mistakes To Avoid
- Do not lift your chest too high too quickly. Progress gradually.
- Keep elbows slightly bent to prevent straining the lower back.
Variations
After having attained the cobra pose, turn your head to the left and try to focus your eyes on your left heel. You can do the same on the other side as well.
Benefits
- May tone the abdomen
- May improve flexibility of the middle and upper back
- May strengthen the shoulders and the back
- May reduce stress and fatigue
Caution
Bend backward only till you experience the stretch on your abdomen, thighs, and the back. Please relax even if you experience slight pain while stretching. In such cases, you can do Ardha Bhujangasana.
Additionally, pregnant women, and individuals suffering from back injury and Carpal tunnel syndrome must not perform this pose.
11. Dhanurasana (Bow Pose)
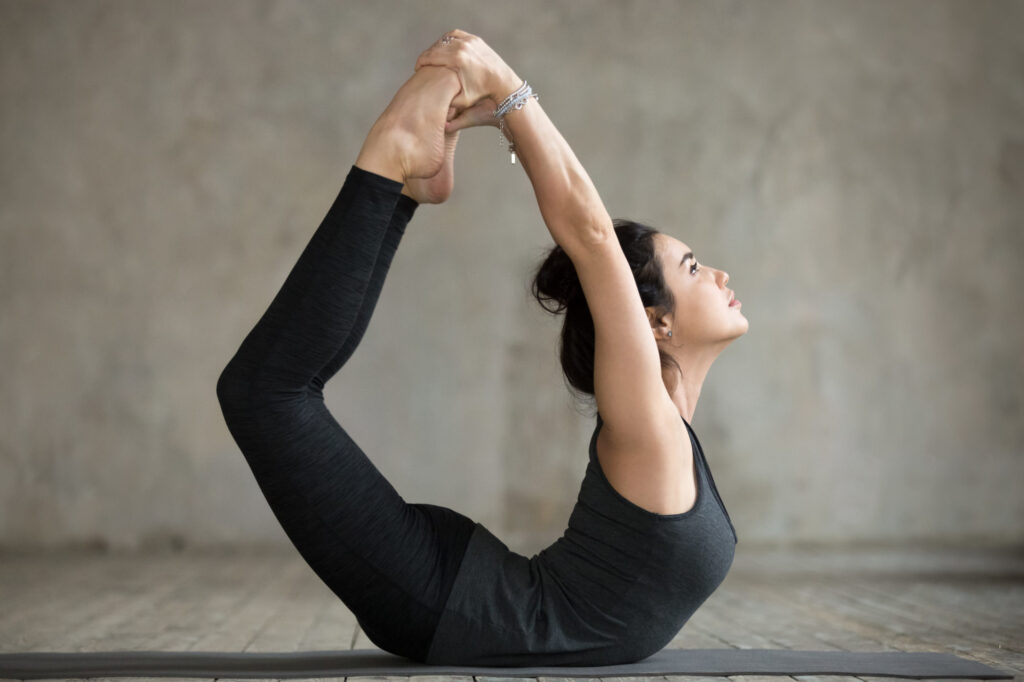
Dhanurasana (Bow Pose) is an invigorating backbend yoga pose that stretches and strengthens the body while improving digestion and stimulating fat reduction in the abdominal region. Here’s a comprehensive guide:
Benefits of Dhanurasana
- Strengthens and Tones the Abdomen
- The pose stretches and tones abdominal muscles, aiding in fat reduction.
- Improves Digestion
- Stimulates the digestive organs, improving metabolism and relieving constipation or bloating.
- Stretches the Entire Body
- Provides a deep stretch to the back, chest, thighs, and shoulders, enhancing flexibility and posture.
- Reduces Stress and Fatigue
- Opens the chest and promotes deep breathing, reducing stress and energizing the body.
- Enhances Spinal Health
- Improves spinal flexibility and helps relieve back pain by strengthening the back muscles.
Step-by-Step Instructions
- Starting Position
- Lie flat on your stomach on a yoga mat with your arms resting by your sides, palms facing upward.
- Bend Your Knees
- Inhale and bend your knees, bringing your heels toward your buttocks. Keep your feet hip-width apart.
- Grab Your Ankles
- Reach back with your hands and clasp your ankles firmly. Avoid holding your toes or the tops of your feet.
- Lift and Stretch
- Inhale deeply, lifting your chest and thighs off the ground simultaneously. Pull your ankles gently upward while keeping your arms straight.
- Form the Bow Shape
- Your body should resemble a taut bow, with your arms acting as the string. Focus on keeping your neck neutral and shoulders relaxed.
- Hold the Pose
- Maintain the position for 10–20 seconds, gradually increasing as your flexibility and strength improve. Breathe deeply and steadily.
- Release Gently
- Exhale and slowly lower your chest and thighs to the ground. Release your ankles and rest your arms by your sides.
- Repeat
- Rest for a few breaths and repeat 2–3 times.
Tips for Beginners
- If reaching your ankles is challenging, use a yoga strap around your feet.
- Avoid straining your neck; keep your gaze forward or slightly upward.
- Practice on a soft surface to protect your hips and abdomen.
Precautions
- Avoid Dhanurasana if you have:
- Recent abdominal surgery
- Severe back pain or spinal injuries
- High blood pressure, heart problems, or hernia
- Always perform this pose on an empty stomach.
Would you like a sequence incorporating Dhanurasana or recommendations for poses to practice alongside it?
12. Relax with Shavasana (Corpse Pose)
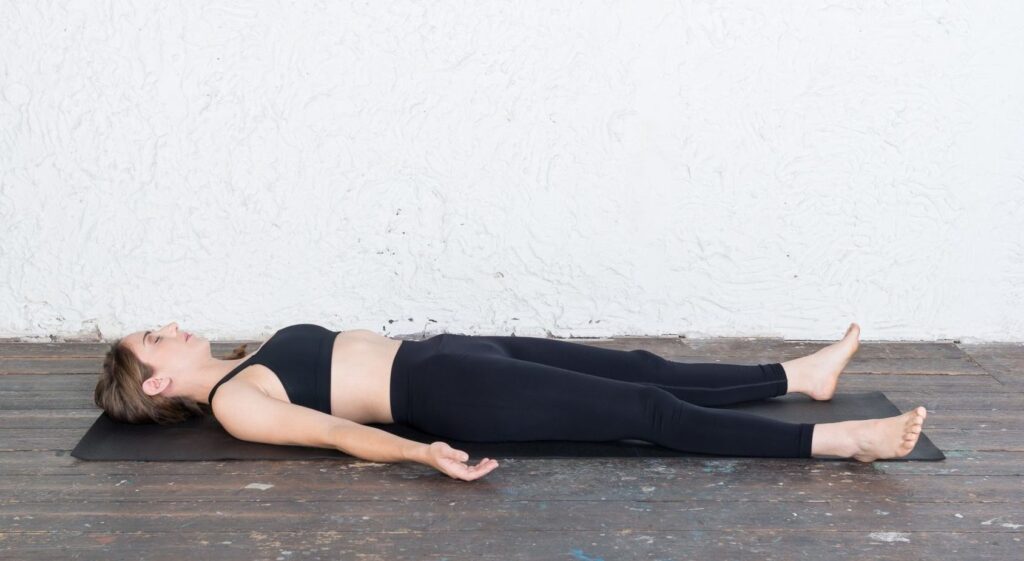
Shavasana (Corpse Pose) is a deeply restorative yoga pose that allows the body and mind to fully relax, rejuvenate, and integrate the benefits of your practice. Here’s how to practice it effectively:
Benefits of Shavasana
- Promotes Deep Relaxation
- Relieves stress and anxiety by calming the nervous system and encouraging a meditative state.
- Improves Focus and Awareness
- Enhances mindfulness by allowing the mind to rest, improving concentration and mental clarity.
- Relieves Physical Fatigue
- Releases tension from muscles, helping the body recover after a workout or yoga session.
- Regulates Breathing
- Encourages slow, deep breathing, which promotes oxygenation and reduces blood pressure.
- Encourages Healing
- Activates the parasympathetic nervous system, supporting overall health and well-being.
Step-by-Step Instructions
- Starting Position
- Lie flat on your back on a yoga mat in a quiet, comfortable space.
- Position Your Body
- Extend your legs straight out, slightly apart, allowing your feet to relax and fall naturally outward.
- Place your arms alongside your body with palms facing upward, creating space between your arms and torso.
- Adjust for Comfort
- Close your eyes and ensure your head is centered. Use a folded blanket under your head or knees if needed for comfort.
- Relax Your Entire Body
- Start at your feet and consciously relax each part of your body, moving upward to your head. Let go of any tension.
- Focus on Your Breath
- Take slow, deep breaths, allowing your body to sink deeper into relaxation with each exhale. Maintain a steady rhythm.
- Enter a Meditative State
- Let your mind become calm and still. If thoughts arise, acknowledge them and gently let them go, returning your focus to your breath.
- Hold the Pose
- Remain in Shavasana for 5–10 minutes, or longer if desired, to fully relax and rejuvenate.
- Exit the Pose Gently
- To come out of Shavasana, wiggle your fingers and toes, bringing awareness back to your body. Roll to one side and rest for a moment before sitting up slowly.
Tips for a Deeper Experience
- Use soothing music or guided meditations to enhance relaxation.
- Practice Shavasana in a dimly lit or quiet room to minimize distractions.
- Cover yourself with a light blanket to stay warm if needed.
Precautions
- Avoid falling asleep; Shavasana is meant to be a state of conscious relaxation.
- If lying flat is uncomfortable, try bending your knees slightly with a bolster or pillow under them.
Would you like tips on integrating Shavasana into your routine or a guided meditation for this pose?
13. Santolanasana (Plank Pose)
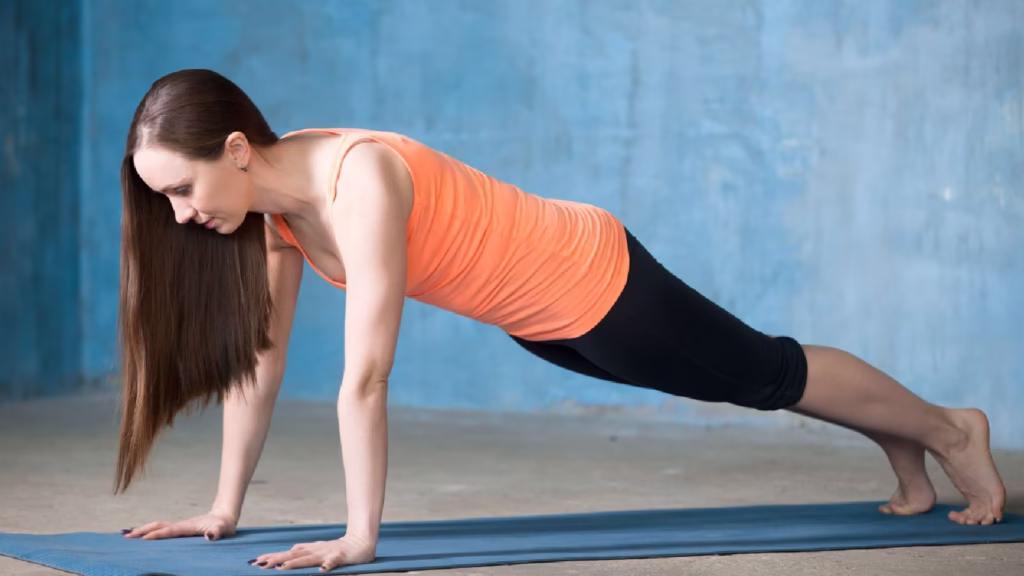
Santolanasana (Plank Pose) is a foundational yoga pose that develops strength, stability, and focus. It’s an excellent way to build core strength and enhance overall body balance. Below is a detailed guide:
Benefits of Santolanasana (Plank Pose)
- Strengthens Core Muscles
- Engages the abdominal muscles, building strength and endurance in the core.
- Tones Upper Body
- Strengthens the arms, shoulders, and chest as they support your body weight.
- Improves Balance and Stability
- Activates stabilizing muscles, improving balance and overall coordination.
- Promotes Posture Alignment
- Teaches proper spinal alignment and strengthens muscles that support a healthy posture.
- Burns Calories
- Engages multiple muscle groups, making it an efficient pose for calorie burning and fat reduction.
Step-by-Step Instructions for Santolanasana
- Starting Position
- Begin in Adho Mukha Svanasana (Downward Dog Pose) or on your hands and knees in a tabletop position.
- Move into Plank
- Shift your body forward so your shoulders are directly over your wrists.
- Straighten your legs behind you, balancing on the balls of your feet.
- Align Your Body
- Keep your body in a straight line from the crown of your head to your heels. Avoid sagging your hips or lifting them too high.
- Engage Core and Muscles
- Tighten your abdominal muscles, glutes, and thighs. Press firmly into your palms and spread your fingers for stability.
- Focus on Your Breath
- Maintain steady and deep breaths while holding the position.
- Hold the Pose
- Start by holding for 20–30 seconds. Gradually increase the duration to 1 minute or more as you build strength.
- Release
- Lower your knees gently to the ground and transition into Balasana (Child’s Pose) for relaxation.
Modifications for Beginners
- Knee Plank: Lower your knees to the floor while keeping your upper body aligned.
- Wrist Support: Place a folded towel under your wrists or practice on your forearms in Forearm Plank Pose.
- Shorter Duration: Start with 10–15 seconds and gradually increase as your strength improves.
Advanced Variations
- Side Plank (Vasisthasana): Rotate your body to balance on one hand and the edge of one foot, raising the other hand toward the ceiling.
- One-Legged Plank: Lift one leg off the floor, keeping your body steady and aligned.
- Dynamic Plank: Transition between Plank and Downward Dog or Chaturanga Dandasana for an extra challenge.
Precautions
- Avoid this pose if you have wrist, shoulder, or lower back injuries.
- Maintain proper alignment to prevent strain on your lower back.
- Practice on a yoga mat or padded surface for comfort.
Would you like a video guide, or do you want tips on incorporating Plank Pose into a yoga or fitness routine?
Yoga Experts Tips To Reduce Belly Fat
Reducing belly fat with yoga requires a combination of specific poses, lifestyle adjustments, and mindfulness practices. Here are tips from yoga experts to help you achieve this goal:
1. Practice Core-Strengthening Yoga Poses
Include poses that target the abdominal muscles, improve metabolism, and enhance digestion. Key poses include:
- Bhujangasana (Cobra Pose): Strengthens abdominal muscles and promotes fat reduction.
- Dhanurasana (Bow Pose): Stretches and tones the belly while stimulating digestion.
- Uttanpadasana (Raised Leg Pose): Activates the lower abdomen.
- Santolanasana (Plank Pose): Builds core strength and burns calories.
- Pavanamuktasana (Wind-Relieving Pose): Eases bloating and stimulates digestion.
2. Combine Dynamic Movements and Breathing
- Sun Salutations (Surya Namaskar): A sequence of 12 poses that engages the entire body, increases heart rate, and burns calories effectively.
- Kapalabhati Pranayama: A breathing technique that stimulates abdominal muscles and detoxifies the body.
3. Be Consistent with Your Practice
- Dedicate at least 30 minutes daily to yoga. Combining active poses with relaxation ensures balanced results.
- Begin with 3–5 repetitions of core-focused poses and gradually increase the duration or intensity.
4. Maintain Proper Posture
A slouched posture weakens core muscles and can contribute to belly fat. Regularly practicing yoga improves posture, which helps engage the core even outside your practice.
5. Focus on Mindful Eating
Yoga encourages mindfulness in all areas, including diet. Experts suggest:
- Eating slowly and stopping when you’re full.
- Avoiding processed foods and consuming a nutrient-dense, balanced diet.
- Drinking warm water or herbal teas to aid digestion.
6. Manage Stress with Relaxing Poses
High cortisol levels (stress hormone) can lead to belly fat. Include calming poses such as:
- Shavasana (Corpse Pose): For full relaxation and recovery.
- Balasana (Child’s Pose): To relieve tension in the back and abdomen.
7. Engage in Regular Pranayama
Pranayama helps oxygenate the body and boost metabolism. Effective techniques include:
- Nadi Shodhana (Alternate Nostril Breathing): Balances energy and reduces stress.
- Bhastrika (Bellows Breathing): Increases energy and stimulates metabolism.
8. Stay Hydrated and Rest Well
Dehydration and poor sleep hinder fat loss. Yoga experts recommend:
- Drinking plenty of water to flush out toxins.
- Getting 7–8 hours of quality sleep every night to promote recovery and hormonal balance.
9. Incorporate a Holistic Approach
Yoga works best when combined with:
- A balanced diet.
- Regular aerobic activity (walking, swimming, etc.).
- Positive lifestyle habits like avoiding smoking and excessive alcohol.
Would you like a specific yoga sequence or detailed instructions for any of these tips?
Key Takeaways
- Age, genetics, poor diet, and a sedentary lifestyle can cause belly fat.
- Tadasana, Pavanamuktasana, and Uttanpadasana are some effective yoga asanas for reducing belly fat.
- These poses also improve your posture, relieve mental exhaustion, balance the menstrual cycle, and improve digestion.
Infographic: Tips To Reduce Belly Fat
Belly fat is a growing problem in people of all ages due to a lack of exercise and a sedentary lifestyle. However, a few lifestyle changes, some exercising, and certain yoga asanas can melt away that stubborn belly fat and help you stay fit. The following infographic lists a few tips you can follow in addition to the asanas listed above to get rid of belly fat. Check it out!
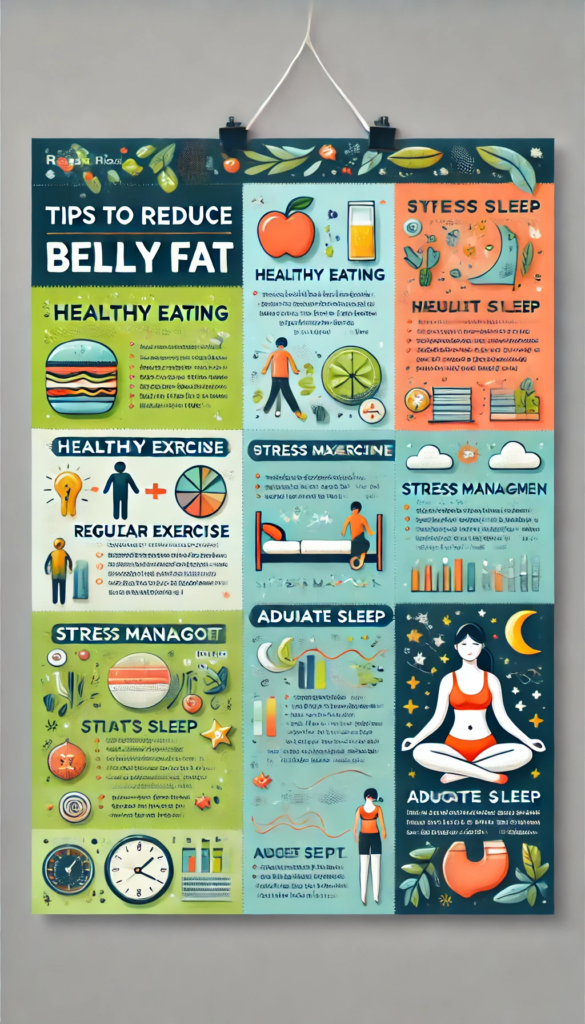
Yoga asanas that help reduce the belly fat target the flab build up in the abdomen alongwith toning and strengthening your core muscles. These also help correct your posture and ease back pains and menstrual cramps when done correctly. Naukasana, pavanamuktasana, surya namaskar, and tadasana are a few of the popular yoga asanas listed above that help you reduce belly fat, and add flexibility, and strength to your core area. Once your body gets comfortable with the regular asanas, you can also level up to the advanced variations to make them more challenging and effective for you. These are also great for improving wellness and mindfulness. We have also included few tips from noted yoga professionals to help you carry out these asanas more efficiently.
Personal Experience: Source
Getmakeup’s articles are interwoven with authentic personal narratives that provide depth and resonance to our content. Below are the sources of the personal accounts referenced in this article.