Kurmasana or Tortoise Pose is a yoga asana. Sanskrit: कूर्मासन; Kurma – Tortoise, Asana – Pose; Pronounced as: Koohr-Mah-Sah-Nah.
Kurmasana or the Tortoise Pose resembles a tortoise that withdraws into its shell when threatened or agitated. The name comes from the Sanskrit words ‘kurma’ meaning tortoise and ‘asana’ meaning pose. Practicing the Kurmasana enables you to draw inward and cut out the clutter of the outside world. It will give you a euphoric feeling of connecting with your inner world.
Everything You Need To Know About Kurmasana
- What You Should Know Before You Practice Kurmasana
- How To Do Kurmasana (Tortoise Pose)
- Precautions To Be Taken
- Beginners’ Tips
- Kurmasana Pose Variations
- Benefits Of Kurmasana
- Preparatory Poses
- Follow-Up Poses
1. What You Should Know Before You Practice Kurmasana
Kurmasana, also known as Tortoise Pose, is a challenging seated yoga posture that mimics a tortoise withdrawing into its shell. It promotes flexibility, mindfulness, and relaxation. However, before practicing Kurmasana, there are essential considerations to ensure safety and effectiveness. Here’s what you should know:
1. Understand the Benefits
Kurmasana offers several physical and mental benefits:
- Enhances flexibility in the hips, hamstrings, and shoulders.
- Calms the mind and reduces stress.
- Stimulates abdominal organs and aids digestion.
- Helps lengthen the spine and improve posture.
2. Prerequisites
- Warm-up: Prepare with poses that stretch your hips, hamstrings, and shoulders (e.g., Child’s Pose, Forward Fold, or Pigeon Pose).
- Flexibility Level: This pose requires moderate to advanced flexibility. Beginners should practice under supervision.
3. Contraindications
- Injuries: Avoid Kurmasana if you have injuries in the lower back, hips, knees, or shoulders.
- Pregnancy: This pose is not recommended during pregnancy due to its compressive nature.
- Chronic Conditions: Consult a healthcare provider if you have conditions affecting your spine, joints, or circulation.
4. Alignment and Safety Tips
- Start Gradually: Ease into the pose rather than forcing your body. Listen to your limits.
- Avoid Rounding the Back: Aim to extend through the spine rather than collapsing into the pose.
- Use Props: Yoga blocks or cushions can support your chest or head if you cannot fully fold forward.
5. Breathing
Maintain steady, deep breathing throughout the pose to help relax your muscles and focus your mind. Holding your breath may increase tension.
6. Modifications and Variations
- For beginners: Practice Supta Kurmasana (Reclined Tortoise Pose) to experience the benefits without strain.
- For advanced practitioners: Work toward clasping the hands behind the back or bringing the feet closer to the head for deeper stretches.
7. Practice Mindfully
Kurmasana encourages introspection and patience. Use it as an opportunity to cultivate mindfulness, and don’t compare your progress to others.
By preparing your body and approaching the pose with respect and awareness, you can enjoy the full benefits of Kurmasana while minimizing the risk of injury.
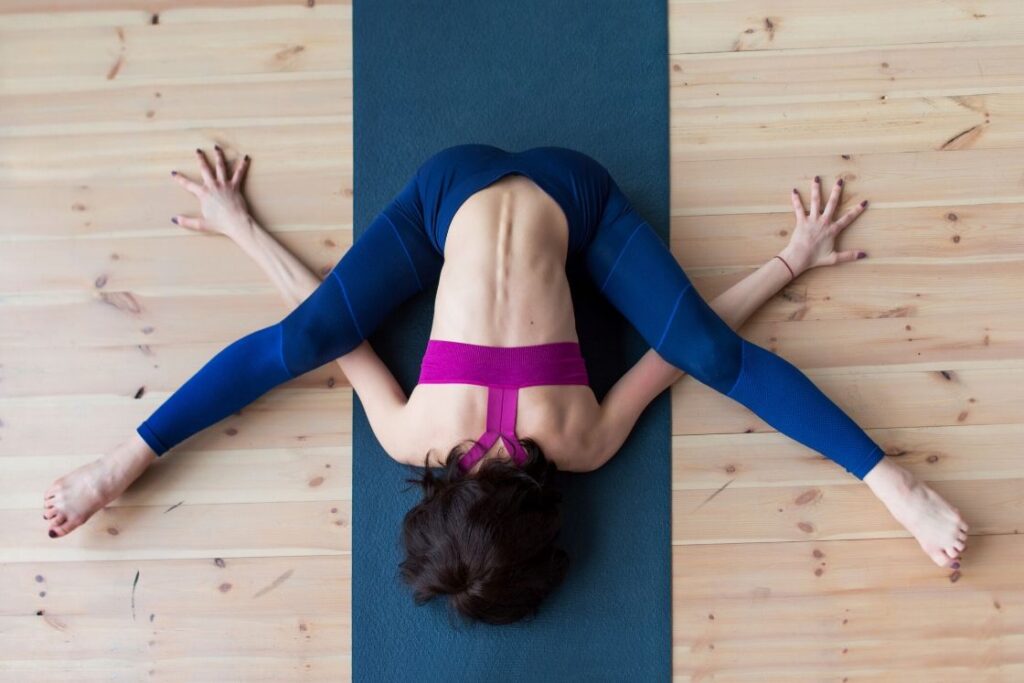
2. How To Do Kurmasana (Tortoise Pose)
You can assume Kurmasana in four steps.
- Sit down with your legs spread out and back erect. Place your arms alongside your hips. Keep your legs arms’ distance apart and press your thighs into the ground. Raise your chest and take a few deep breaths.
- Bend your knees and bring your feet closer to your hips. Stretch your arms forward in between the legs and bend your torso down and forward along with the arms.
- Bend your knees further to facilitate your shoulders to go beneath your knees. Then, shift your stretched arms to the sides. Now, bring your thighs inwards and through them, apply pressure on your shoulders to bring your face and chest forward and down. Straighten your legs and make sure your inner thighs touch your side ribs.
- Bring down your head with your chin touching the ground, and gaze downwards. Extend your arms sidewards as much as you can. Relax and breath deeply. Hold the pose for a few seconds. Relax.
3. Precautions To Be Taken
When in the Kurmasana, if you feel pain in the knees, move your arms slightly forward from the sides to ease the pain. You must prepare your body to assume the Kurmasana. Do the necessary preparatory poses before assuming the pose. Also, you should know your body limitations and when to stop.
Avoid the pose if you are pregnant or menstruating. It is better to skip the pose if you have herniated discs and tight lower back muscles. If you have a shoulder, hip or arm injury, do not practice Kurmasana. Do not overstrain your muscles while in the pose. If you are suffering from sciatica or chronic arthritis, avoid the pose.
4. Beginners’ Tips
Kurmasana is an advanced pose, and it takes a certain amount of time to get into it appropriately. Do it under the guidance of a yoga instructor to make it easier for you. Once in the pose, if it becomes difficult to keep the heels of your feet on the ground, place pillows or folded blankets below your legs.
5. Kurmasana Pose Variations
Kurmasana, or Tortoise Pose, has several variations that accommodate different levels of flexibility and experience. These variations can help practitioners progress safely and deepen their practice. Here are the key variations of Kurmasana:
1. Basic Kurmasana (Tortoise Pose)
Description: The traditional seated forward fold with arms extended underneath the legs.
- Steps:
- Sit with legs extended wide.
- Bend forward from the hips, bringing your torso between your legs.
- Slide your arms under your thighs with palms facing down.
- Relax your head toward the mat.
- Focus: Lengthen the spine, avoid hunching, and relax into the pose.
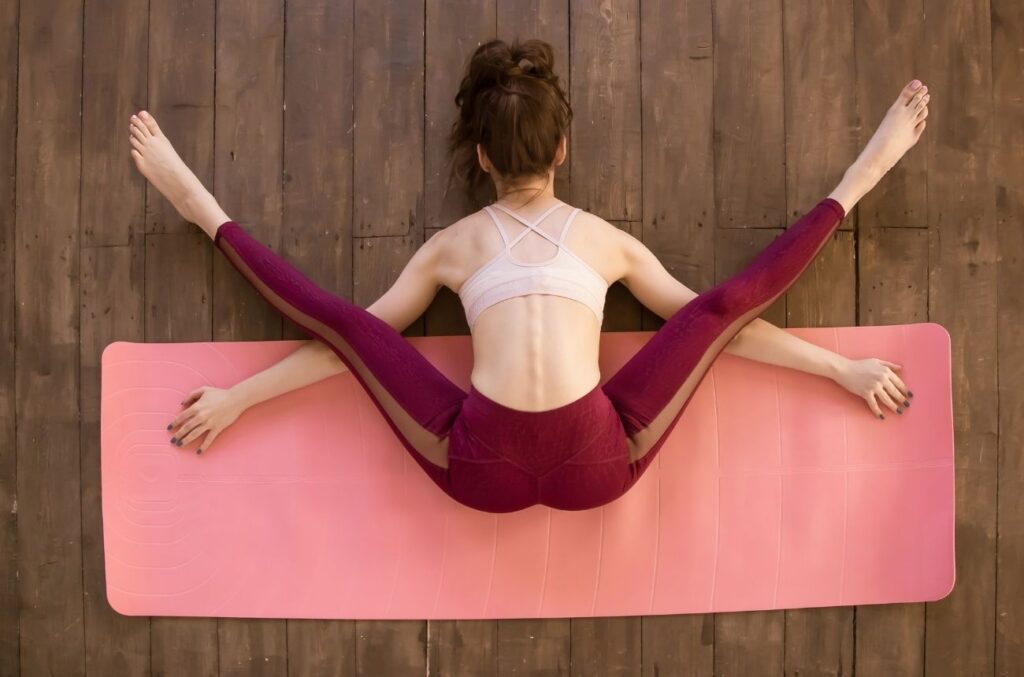
2. Supta Kurmasana (Reclined Tortoise Pose)
Description: A deeper version where legs are crossed behind the head.
- Steps:
- From Kurmasana, bring the legs closer together.
- Cross the ankles behind the head if flexibility allows.
- Clasp the hands behind the back or rest them on the floor.
- Focus: Engage the core to protect the lower back and relax the neck.
- Level: Advanced.
3. Supported Kurmasana (With Props)
Description: A modified version for beginners or those with limited flexibility.
- Steps:
- Place a bolster or folded blanket under your torso for support.
- Extend your arms as far as comfortable, without strain.
- Allow your body to rest on the prop for a restorative experience.
- Focus: Build flexibility in the hips and hamstrings gradually.
4. Half Kurmasana
Description: A preparatory pose with only one leg extended.
- Steps:
- Bend one knee, placing the foot near the groin.
- Extend the opposite leg out straight.
- Fold forward, extending both arms toward the straight leg.
- Focus: Target flexibility on one side at a time.
- Level: Beginner.
5. Dynamic Kurmasana
Description: Involves gentle movements to deepen the stretch gradually.
- Steps:
- Start in Kurmasana.
- Rock your torso gently side to side, exploring the stretch in your hips and spine.
- Use the breath to guide the movement.
- Focus: Explore range of motion and release tension.
6. Partner-Assisted Kurmasana
Description: A partner provides gentle pressure to deepen the stretch.
- Steps:
- Assume Kurmasana.
- Have your partner apply light pressure on your lower back or hips.
- Communicate and adjust pressure to avoid strain.
- Focus: Safely deepen the pose with external support.
7. Baddha Hasta Kurmasana (Bound Hands Tortoise Pose)
Description: Hands are clasped behind the back for an advanced stretch.
- Steps:
- From Kurmasana, extend your arms around your thighs and back.
- Clasp your hands or use a strap if your hands don’t meet.
- Focus: Open the shoulders and deepen the forward fold.
- Level: Advanced.
8. Wide-Legged Kurmasana
Description: Legs are extended wider than in traditional Kurmasana.
- Steps:
- Sit with legs extended as wide as possible.
- Fold forward and slide your arms under the thighs.
- Rest your chest and head toward the floor.
- Focus: Increase hip flexibility and lengthen the spine.
9. Kurmasana Twist
Description: Adds a spinal twist to the pose for variety.
- Steps:
- From Kurmasana, twist the torso to one side.
- Rest one hand on the floor while the other stretches outward or holds the opposite foot.
- Focus: Stretch the obliques and improve spinal mobility.
Tips for Progression:
- Practice preparatory poses like Bound Angle Pose (Baddha Konasana) or Seated Forward Bend (Paschimottanasana).
- Use props and modifications to adapt the pose to your current flexibility.
- Focus on breathwork to relax and deepen the stretch over time.
Kurmasana variations allow practitioners to find a version that suits their level while progressively enhancing their flexibility and strength. Always prioritize comfort and avoid forcing the body into a pose.
6. Benefits Of Kurmasana
- Kurmasana improves the functioning of the digestive and respiratory systems
- It relaxes your neck, head, and shoulders
- It stimulates your abdominal organs and eases flatulence
- The pose releases the tight knots in the lumbar and sacrum areas of your body
- It improves your memory by increasing blood flow to the brain
- The asana helps people suffering from asthma and constipation
- It takes care of all back problems and deals with insomnia
- Kurmasana lengthens your spine and opens your shoulders
- It is a stress buster and withdraws your senses
- It quiets your mind and prepares you for meditation
- The Tortoise Pose refreshes and rejuvenates you
- It is good for the nerves
- Kurmasana improves your posture and is good for those suffering from cervical disorders
- It helps you breathe well and makes your body flexible and toned
7. Preparatory Poses
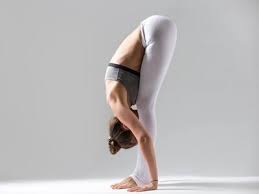
How to Do Uttanasana (Standing Forward Bend)
Uttanasana, or Standing Forward Bend, is a foundational yoga pose that stretches the entire back body and calms the mind. Here’s a step-by-step guide:
Steps to Practice Uttanasana:
- Start in Tadasana (Mountain Pose):
- Stand tall with your feet hip-width apart or together.
- Distribute your weight evenly across both feet.
- Inhale and Lengthen the Spine:
- Raise your arms overhead, engaging your core and lengthening your torso.
- Exhale and Fold Forward:
- Hinge at your hips (not your waist) as you fold forward.
- Keep your spine long and allow your head to relax toward the floor.
- Place Your Hands on the Floor or Props:
- Rest your palms on the floor beside your feet. If you can’t reach, place your hands on blocks, your shins, or clasp opposite elbows.
- Engage and Relax:
- Keep a slight bend in your knees to avoid straining the hamstrings.
- Engage your thighs to lift the kneecaps, protecting the hamstrings.
- Breathe Deeply:
- With each inhale, find length in your spine.
- With each exhale, deepen the fold gently.
- Come Out of the Pose:
- To rise, bend your knees slightly and roll up slowly, vertebra by vertebra.
- Return to Tadasana with your arms by your sides.
Modifications and Variations
- For Beginners:
- Keep your knees bent to reduce strain on the hamstrings and lower back.
- Use blocks under your hands for support.
- For Advanced Practitioners:
- Straighten your legs completely and try to touch your head to your shins.
- Clasp your hands behind your calves or ankles to deepen the stretch.
- Restorative Variation:
- Rest your head on a bolster or a stack of blocks for a calming effect.
Benefits of Uttanasana
1. Physical Benefits:
- Stretches the Entire Back Body: Engages the hamstrings, calves, hips, and lower back.
- Improves Flexibility: Especially in the legs and spine.
- Relieves Tension: Loosens tight muscles, particularly in the back and shoulders.
- Stimulates Organs: Activates the liver, kidneys, and digestive system.
- Enhances Posture: Lengthens and decompresses the spine.
2. Mental and Emotional Benefits:
- Calms the Mind: Reduces stress and anxiety by increasing blood flow to the brain.
- Boosts Focus: Promotes mental clarity and mindfulness.
- Relieves Fatigue: Restorative for the nervous system.
3. Other Benefits:
- Improves Circulation: Enhances blood flow to the head and upper body.
- Eases Menstrual Discomfort: Provides gentle compression to the abdomen.
Precautions
- Injuries: Avoid or modify if you have back, neck, or hamstring injuries.
- High Blood Pressure or Vertigo: Keep the head higher than the heart or avoid the pose.
- Pregnancy: Practice a wide-legged forward bend or modify with props to create space for the belly.
Pro Tips:
- Focus on hinging at the hips rather than rounding the back.
- Use your breath to guide movement, creating space and relaxation in the pose.
- Always practice with mindfulness, respecting your body’s limits.
Uttanasana is a versatile pose that can be practiced by beginners and advanced yogis alike. With regular practice, it improves both physical flexibility and mental clarity.
8. Follow-Up Poses
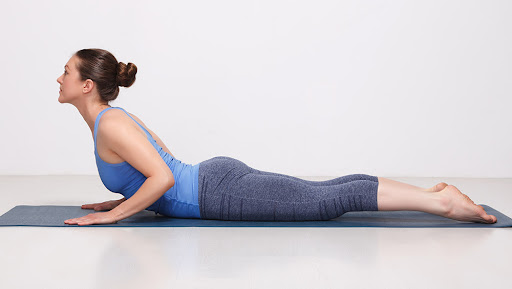
How to Do Bhujangasana (Cobra Pose)
Bhujangasana, or Cobra Pose, is a rejuvenating backbend in yoga that strengthens the spine and opens the chest. Here’s a step-by-step guide to practicing this pose safely and effectively:
Steps to Practice Bhujangasana:
- Start in a Prone Position:
- Lie on your stomach with your legs extended back, tops of the feet pressing into the mat.
- Place your hands under your shoulders, elbows close to your body.
- Engage Your Body:
- Press the tops of your feet, thighs, and pelvis firmly into the mat.
- Roll your shoulders back and down to open the chest.
- Inhale and Lift Your Chest:
- As you inhale, press into your palms and lift your chest off the mat.
- Use your back muscles rather than pushing solely with your hands.
- Find Your Comfort Zone:
- Straighten your arms partially or fully, depending on your flexibility and comfort.
- Keep your elbows slightly bent and close to your body to avoid overextending.
- Relax Your Neck and Gaze:
- Look slightly upward or forward, keeping your neck neutral and avoiding compression.
- Breathe and Hold:
- Hold the pose for 15–30 seconds, breathing deeply.
- Focus on expanding your chest and feeling the stretch in your back.
- Release the Pose:
- Exhale and slowly lower your chest back to the mat.
- Rest with your head to one side or in Child’s Pose to relax your spine.
Modifications and Variations
- For Beginners:
- Keep your elbows bent and only lift your chest slightly off the mat.
- Place a folded blanket under your pelvis for support.
- For Advanced Practitioners:
- Lift higher, straightening your arms fully for a deeper stretch.
- Combine with other backbends like Upward Dog for progression.
- Supported Variation:
- Use blocks under your hands to reduce strain on your lower back.
Benefits of Bhujangasana
1. Physical Benefits:
- Strengthens the Spine: Enhances flexibility and strengthens the back muscles.
- Stretches the Front Body: Opens the chest, shoulders, and abdomen.
- Improves Posture: Encourages spinal extension and counteracts slouching.
- Stimulates Organs: Activates the abdominal organs, improving digestion.
- Relieves Back Pain: Alleviates mild stiffness in the lower back.
2. Mental and Emotional Benefits:
- Boosts Energy: Reduces fatigue and promotes alertness.
- Relieves Stress: Opens the heart chakra and promotes emotional release.
3. Therapeutic Benefits:
- Eases Respiratory Issues: Expands the chest and lungs, enhancing breathing capacity.
- Relieves Menstrual Discomfort: Provides gentle stimulation to the pelvic region.
Precautions
- Back Injuries: Avoid if you have severe lower back pain or recent spinal surgery.
- Pregnancy: Not recommended during pregnancy due to abdominal pressure.
- Wrist or Shoulder Pain: Modify by keeping your forearms on the mat (Sphinx Pose).
Pro Tips:
- Focus on engaging your core and using back muscles rather than pushing excessively with your arms.
- Keep your pelvis and thighs grounded to avoid straining your lower back.
- Synchronize your breath with your movements, inhaling as you lift and exhaling as you release.
Bhujangasana is a cornerstone pose for building spinal flexibility, strengthening the upper body, and promoting overall vitality. With consistent practice, it can improve both your physical and mental well-being.