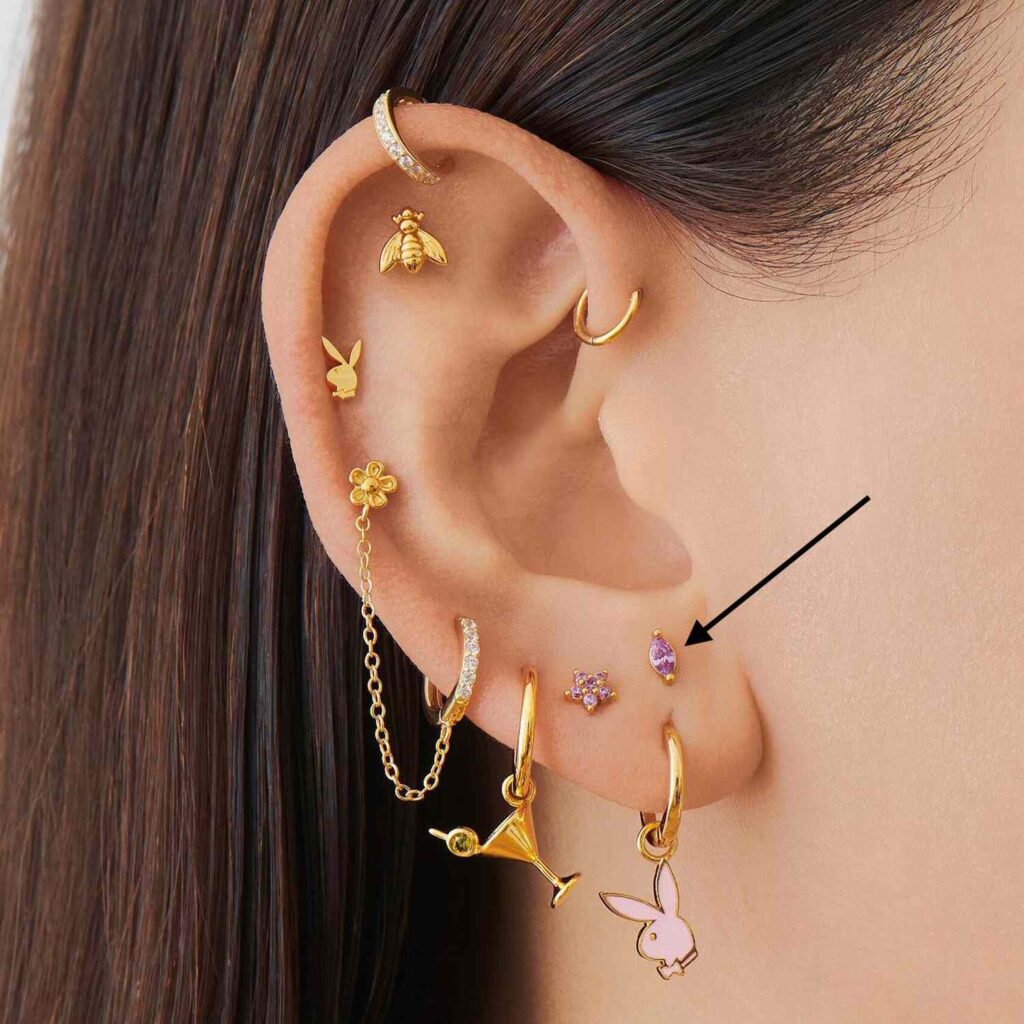
Piercing has become a statement of the trend for everyone in this age, starting from Kylie Jenner’s trio of hoops to Miley Cyrus’s four piercings and three-hoop cuffs.
Multiple ear piercings are on-trend; moreover, pierced ears are a creative and sophisticated way to express your personality. Fashion Stylist Michelle Wagman says, “Piercing typically refers to puncturing the skin or cartilage to insert jewelry. It is a common form of body modification and can be performed on various body parts, such as the ears, nose, tongue, and belly button.” Many of you must be looking for how to pierce your ear but did you know piercing your ears can be beneficial to stimulate the surrounding nerve areas too? It’s also breathtaking to notice that history has to do so much with piercing ears. Dating back to 5000 years ago, the primitive tribes performed it for their magical purposes. Every nation has its spiritual-religious reasons to pierce ears. Michelle Wagman also adds, “Piercings can be purely decorative or have cultural or religious significance.” If you already have piercings or are considering them but lack the necessary information for it, you are in the right place! So, without further ado, check out how to pierce your own ear.
Ace The Look
- Metal Allergies: Opt for hypoallergenic earrings if you are allergic to metals like nickel used in jewelry making.
- Numbing Creams: Try over-the-counter numbing creams to further reduce the pain.
- Avoid Swimming: Avoid dipping your new piercing in pool water to prevent infections. But if you really have to swim, use a waterproof wound-sealant bandage.
- Practice Caution: Wait for at least three months before piercing your ears if you have recently delivered a baby. This is to ensure your body can handle the physical trauma of piercing.
In This Article

1. How To Pierce Your Ear Safely At Home?
2. Key Takeaways
3. How Does Ear Piercing Work?
4. How To Safely Pierce Your Own Ears
5. Risks Of Ear Piercing
6. How To Take Care Of Your Pierced Ears
7. Infographic: How To Easily Pierce Your Ears At Home
8. Frequently Asked Questions
9. Illustration: How To Pierce Your Ear: A Complete Guide
How To Pierce Your Ear Safely At Home?
Piercing your ear at home requires strict hygiene and careful steps to minimize risks of infection or complications. Here’s a step-by-step guide:
1. Gather Necessary Tools
- Sterilized needle or piercing kit
- Rubbing alcohol or antiseptic solution
- Cotton swabs
- Marking pen
- Ice or numbing cream (optional)
- Starter earrings (sterilized, preferably stainless steel or hypoallergenic material)
- Gloves (preferably latex or nitrile)
2. Prepare the Area and Tools
- Wash your hands thoroughly with soap and water.
- Sterilize all tools and earrings by soaking them in rubbing alcohol.
- Clean your ear with a cotton swab dipped in rubbing alcohol or an antiseptic.
3. Mark the Piercing Spot
- Use a marker to dot the exact location where you want the piercing.
- Double-check the placement by looking in the mirror to ensure symmetry.
4. Numb the Area (Optional)
- Hold an ice cube wrapped in a cloth against the marked spot for a few minutes.
- Alternatively, apply numbing cream and wait as directed.
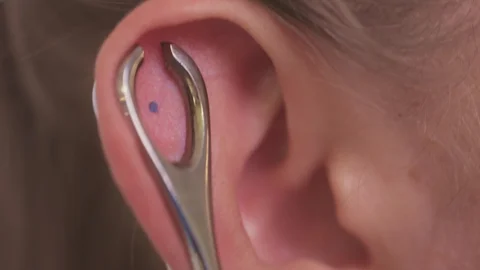
5. Pierce the Ear
- Put on sterilized gloves.
- Hold the sterilized needle at a 90-degree angle to the marked spot.
- Push the needle through the ear quickly and smoothly. Avoid twisting or hesitating.
6. Insert the Earring
- Immediately insert the sterilized earring into the hole while the needle is still in place.
- Secure the earring with its backing.
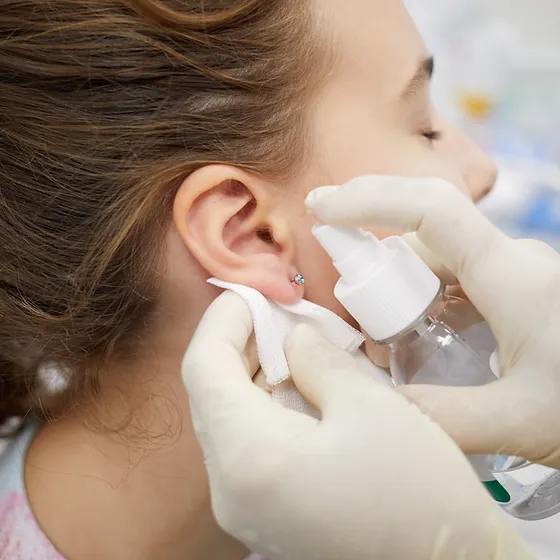
7. Clean the Piercing
- Use a saline solution or antiseptic to clean the area around the piercing twice daily.
- Rotate the earring gently to prevent it from sticking.
8. Aftercare Tips
- Avoid touching the piercing with unclean hands.
- Keep the earring in for at least 6–8 weeks to prevent the hole from closing.
- Watch for signs of infection (e.g., redness, swelling, pus). If symptoms appear, seek medical attention.
Caution
- Avoid piercing your ear at home if you’re inexperienced or lack sterilized tools. Consider visiting a professional piercer for better safety.
- Never reuse needles or earrings without proper sterilization.
Would you like more detailed tips or alternatives?
Key Takeaways
- Piercings take nearly a year to get their shape correctly.
- Discharge, stinging sensation, and feeling unwell are symptoms of an infected ear piercing.
- Rotate the earrings daily to stop the hole from tightening or closing.
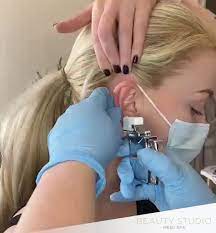
How Does Ear Piercing Work?
Whether you want to have lobe, helix, rook, daith, tragus, antitragus piercings, flat or conch piercing, there are two main ways to do it: through the gun or the needle. Piercing your ears is an easy process, where the needle takes a minute, and the gun slides down within a few seconds. In the case of needle piercing, the piercer chooses a hollow sterilized needle to provide the safest experience. The needle basically works like a bistoury by cutting through the skin to insert it on the other side of the ear. Moreover, don’t stress about placing the earrings after the piercing is done because the needle’s hollow space will do the magic. The earrings will get inside your ears like butter.
In the case of a gun, it will shoot a loop to your earlobe. It is the stem of the jewel that pierces the skin. Then the buckle is positioned on the backside of the ear hole. For some people, the gun seems to be loud and quite traumatic, whereas the needle is more painful and uncomfortably tingling. Everyone can choose one according to their preferences. These two techniques can be used for piercing ears at home or any professional place. You should consider the benefits of having a professional handle the process before you decide to pierce your own ears at home. Professional piercers are equipped with the right tools and training to ensure minimal pain and reduce the risk of infection or complications that can arise from improper techniques. Their expertise ensures a more accurate placement and cleaner procedure, contributing to faster healing and a better experience. But, until you have good experience and knowledge, don’t try them at home.
However, an important point to note here is that sometimes you might be confused about how to know if your ear piercing is infected. This is a constant worry for anyone who pierces their ears, so here are some points on how to tell if your ear piercing is infected:
- Crumbly discharge.
- Stinging sensation with pain and redness in the pierced area
- The earrings might get stuck as the skin might swell up.
- A burning sensation in the pierced area.
- Feeling unwell.
Once you pierce your ears, you should check for any signs of infection around the piercing site. Recognising these signs early on can prevent further complications from arising. If you notice any of these signs, consult a healthcare professional to avoid more severe infections or long-term issues. Continue reading for more information on how to carry out this procedure safely at home.
How To Safely Pierce Your Own Ears
Piercing your own ears requires careful preparation and adherence to safety measures to minimize risks. Here’s how to do it safely:
Step-by-Step Guide:
1. Gather Supplies
- Sterilized needle or piercing kit: Use a hollow needle specifically for piercings, available online or at a pharmacy.
- Starter earrings: Choose hypoallergenic materials like surgical steel or titanium.
- Cleaning solution: Rubbing alcohol or saline solution.
- Cotton balls/swabs: For cleaning.
- Gloves: Disposable, sterile gloves.
- Marking pen: To pinpoint the piercing spot.
- Ice or numbing cream: Optional for pain relief.
2. Prepare the Environment
- Wash your hands thoroughly.
- Set up a clean workspace, free from dust and contaminants.
- Sterilize all tools, including the needle and earrings, by soaking them in rubbing alcohol.
3. Clean Your Ear
- Wipe the front and back of your ear with an alcohol-soaked cotton ball.
- Let the ear dry completely.
4. Mark the Piercing Spot
- Use a mirror to mark the desired spot with a sterile pen.
- Double-check the placement to ensure it’s symmetrical on both ears (if applicable).
5. Numb the Area (Optional)
- Hold an ice cube wrapped in a clean cloth against your ear for 5–10 minutes.
- Alternatively, apply a numbing cream as directed on the package.
6. Perform the Piercing
- Put on sterile gloves.
- Hold the needle at a 90-degree angle to the marked spot.
- Push the needle through the ear quickly and smoothly. Avoid hesitation to reduce pain and uneven piercing.
- Immediately follow with the insertion of the earring into the new hole.
7. Secure the Earring
- Attach the earring backing, ensuring it’s not too tight to allow room for swelling.
8. Clean the Piercing
- Clean the area with a saline solution twice daily.
- Rotate the earring gently to prevent it from sticking.
9. Monitor Healing
- Keep the earring in place for 6–8 weeks.
- Avoid touching the piercing with dirty hands.
- Be cautious of hair, clothing, and other objects that could tug on the earring.
Important Safety Tips
- Avoid reusing needles: Always use a new, sterile needle.
- Don’t pierce with non-sterile tools: Improper equipment can lead to infections.
- Seek medical attention: If you notice excessive swelling, redness, or pus, consult a healthcare professional.
If you’re unsure or uncomfortable with the process, it’s safer to visit a professional piercer. Would you like advice on aftercare or piercing locations?
How To Take Care Of Your Pierced Ears

Proper aftercare is essential to ensure your pierced ears heal smoothly and avoid infection. Here’s how to take care of your pierced ears:
1. Clean the Piercing Daily
- Use a saline solution: Clean the piercing twice daily with a saline solution or a store-bought ear piercing cleaning solution.
- Steps:
- Wash your hands thoroughly.
- Dip a cotton swab in the solution and gently clean around the front and back of the piercing.
- Remove any crust or buildup without rotating the earring initially.
2. Avoid Touching the Piercing
- Keep your hands off the piercing unless you’re cleaning it.
- Touching the area with unclean hands can introduce bacteria and cause infection.
3. Keep Earrings In Place
- Leave the starter earrings in for at least 6–8 weeks (or as recommended by your piercer).
- Removing them too soon can cause the hole to close or heal improperly.
4. Prevent Irritation
- Avoid tight clothing: Don’t let fabrics rub against the piercing.
- Be careful with hair: Keep hair away to prevent tangling or irritation.
- Skip makeup or products: Avoid applying lotions, perfumes, or hair products near the piercing.
5. Monitor for Infection
- Watch for signs of infection such as redness, swelling, pain, or discharge.
- If you notice these symptoms, clean the area more frequently and consult a doctor if the issue persists.
6. Rotate Earrings Gently
- After the first week, you can gently rotate the earrings during cleaning to prevent them from sticking. Avoid excessive twisting, which can irritate the skin.
7. Avoid Swimming
- Stay out of pools, hot tubs, and open water for at least two weeks, as these can harbor bacteria.
8. Switch to New Earrings (After Healing)
- After 6–8 weeks, you can replace the starter earrings with new ones.
- Opt for hypoallergenic materials like surgical steel, titanium, or gold.
9. Continue Maintenance
- Even after healing, clean your earrings and piercings regularly.
- Avoid heavy or dangling earrings until the piercing is fully healed.
Tip: If you’re unsure about the healing process or encounter any complications, consult a professional piercer or doctor. Would you like more advice on earrings or troubleshooting issues?
Infographic: How To Easily Pierce Your Ears At Home
Ear piercings are a popular way of self-expression. If you are tired of plain earlobe piercing, it’s time to jazz things up a little. You can easily create as many ear piercings as you like at home. Mix and match cute studs and drop earrings, and voila! However, there are a few simple steps you must carefully follow. Check out the infographic below to learn more.

Body modification has become a popular way to express oneself. Ear piercing is one of the most popular types of body modification that can be done at home. However, it’s highly recommended that you get it done by a professional piercer for safety reasons. Following proper aftercare practices like regular cleaning and maintaining the piercings helps you to avoid infections and scarring. However, infections might occur in a healed piercing area too. To prevent that, choosing the perfect size of piercing earrings is essential. If you see any complications, then proper treatment can help in treating the infections. Moreover, wait until you’re healed adequately after putting on the starter earrings. Cleanse the piercing using a mild antiseptic lotion. Disinfect twice a day for about three weeks, then adopt a more prolonged interval until complete healing.
Frequently Asked Questions
- Can I use a sewing needle to pierce?
No, you should not pierce your body parts with a sewing needle due to the higher risk of skin infection.
2. Can you get paralyzed from piercing your ear?
No, the act of piercing your ear does not paralyze you. However, not cleaning the wound properly or piercing with a dirty needle can result in an infection. In rare cases, the infection may lead to paralysis.
3. Do ear piercings bleed?
Yes, ear piercing can bleed immediately after the procedure. If you notice pus oozing out with the blood, consult your doctor.
4. Is gunshot ear piercing painful?
Yes, gunshot ear piercing is painful. Piercing with a needle is considered a safer and less painful procedure than gunshot piercing.
Illustration: How To Pierce Your Ear: A Complete Guide
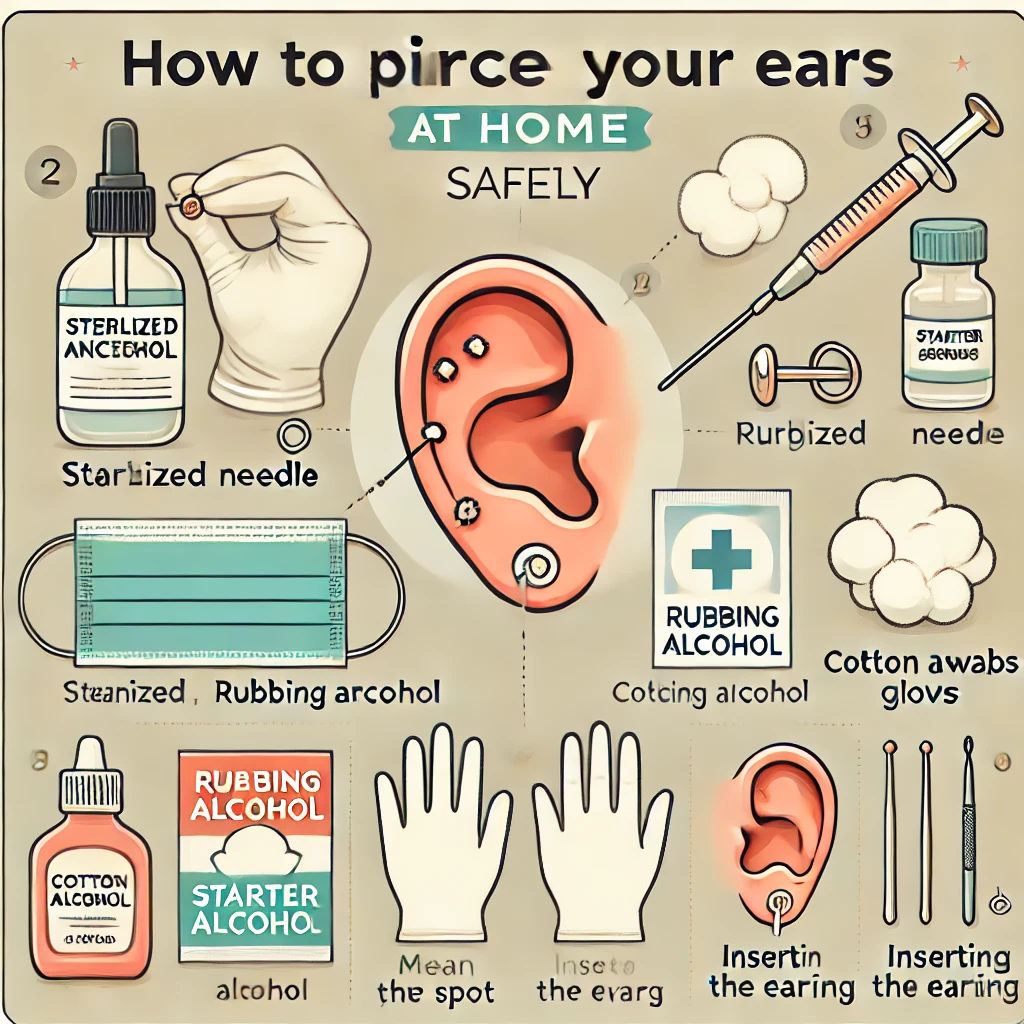
Here is an infographic visually detailing the steps for safely piercing your ears at home. Each step is clearly illustrated, from preparation to aftercare. Let me know if you’d like any edits or additional details!